SecureCRT® FAQ

Select by category

Yes, in most cases. SecureCRT and SecureFX® are available for export under U.S. Bureau of Industry and Security regulations governing strong encryption software. Import restrictions by other countries may also affect encryption software availability. For more information, please see our web page on Exporting Encryption Software.

What is the upgrade process?

SecureCRT is designed to be installed directly in place of prior versions, so you only need to download the installer, and then run it. There is no need to uninstall the older version prior to installing the newer one since in most cases the new version will automatically uninstall the old version for you. Cases where an older version may not be removed involve upgrading from very old versions of SecureCRT (5.5.4 and older) to newer versions of SecureCRT.

How do I keep my settings?

Default SecureCRT installations do not change, alter, remove, or otherwise put in jeopardy your existing sessions/settings. However, if your organization has deployed SecureCRT initially using a customized installation, you will need to seek assistance from your organization's deployment team in determining the expected behavior of an upgrade installation.

Is there a quick way to find out if I am eligible for an update?

Yes. Please visit the the Updates Policy page for more information.

How much does it cost?

Depending on the option chosen at the time of your license purchase, SecureCRT licenses include either 1 or 3 years of access to product updates and technical support. In SecureCRT versions 6.1 and newer, you can determine when the eligibility timeframe for your existing license expires by clicking on the main Help pull-down menu and choosing the About SecureCRT... menu item. If you are running SecureCRT on the macOS platform, the "about" dialog is available within the main SecureCRT pull-down menu. For more information or if you have an older version of SecureCRT, please see the Updates Policy page. If your license is not eligible for a free update, but you are interested in renewing your license, you can review upgrade pricing information and purchase online, or contact us.

SecureCRT does not have a "timeout" feature which automatically disconnect sessions. However, many servers disconnect idle sessions after a period of inactivity. Inactivity is sometimes defined by a server as no information received from the client, so it may timeout even if new data is continuously being displayed in the SecureCRT window. If you see a disconnect occur after a period of time elapses without any user input activity, the disconnect is being initiated by an idle timeout setting on the remote system or on a firewall/router/VPN server that resides somewhere in the network stack/path between SecureCRT and the remote system.

Why doesn't this happen to other applications like my web browser?

Other applications like web browsers can transparently retry failed communications because they do not have to maintain an open connection. This level of transparency is not available when SSH (or Telnet, etc.) sessions are disconnected by an idle timeout on a remote server or a firewall/router/VPN server.

Is there anything that can be done to prevent a connection from closing?

If you find your sessions being disconnected after a certain period of inactivity, you can take advantage of anti-idle features in SecureCRT to try and keep connections open for longer periods of time. You can find two anti-idle options in the Session Options / Terminal category: Send protocol NO-OP and Send string.

The Send protocol NO-OP option is available when using the SSH2 or the Telnet protocol. It sends data at the TCP protocol level and does not send any data to the remote which would be displayed. The Send protocol NO OP option is the suggested mechanism for anti-idle since it will typically not interfere with applications running on the remote system.

The Send string option simulates an actual key-press, so the data to send is sent to the remote and will be displayed (possibly interfering with an application running on the remote system). Since sending a key-press might have unintended consequences, the data to send should be chosen carefully. Simulating a space and backspace may be an optimal solution for many environments. To send space and backspace, enter " \b" (without quotes) in the Send string entry box.

Why does the SecureCRT window or tab close when I lose my connection?

SecureCRT provides an option that allows for automatically closing a window or a tab when the connection within it is closed. This option is not enabled by default, so if you're seeing this behavior, it's likely that you've enabled it (or it was enabled by whomever created the configuration files your installation of SecureCRT is using).

If you wish to keep the SecureCRT Window/tab open when the connection within the window/tab closes, you'll need to reset the option back to its default setting:

  1. Open the Session Options dialog.
  2. Select the Terminal category, and locate the Close on disconnect option.
  3. Ensure the Close on disconnect option is not enabled.
  4. Close the Session Options dialog to save your settings.

The SSH protocol has two generations: SSH, the initial draft protocol dating to 1995, which is now labeled SSH1, and SSH version 2, usually called SSH2, which was first published in 1998. SSH2, the current version of the Secure Shell protocol, was developed under the Internet Engineering Task Force (IETF) Secsh working group.

SSH1 was developed through 1998, when the technical focus on security issues and optimization shifted to SSH2. The SSH2 protocol was a complete reconception of the protocol and is intended to remove limitations in SSH1, such as the absence of message authentication codes (MACs). The SSH1 draft documentation is not part of the IETF process and does not match the current SSH1 server implementations. SSH1 has a significant installed base, particularly among early adopters of Secure Shell, and has a more open server licensing for some organizations. However, the maturity and improved security of SSH2 make it VanDyke Software's preferred protocol.

VanDyke Software believes that SSH2 is the current best choice protocol. Revised from the ground up, SSH2 has many architectural and practical improvements over SSH1, including addressing potential security flaws. The most immediate advantage to SSH2 is that port forwarding multiple channels is faster and more reliable. One channel can no longer consume all available bandwidth and slow other channels or sessions to a crawl, as in SSH1. SSH2 is also the protocol where new development effort at several companies is being focused, whether OS support for new platforms or in extending SSH2's capabilities. Security concerns specifically are best addressed in the SSH2 protocol.

Organizations that used SSH1 servers for licensing reasons now have a choice of alternative SSH2-based solutions. VanDyke Software offers the VShell® SSH2 server for Windows, Linux, and macOS. The OpenSSH server project undertaken by OpenBSD developers also supports SSH2, and is available under a freeware license for OpenBSD and other UNIX / Linux operating systems.

Note: This information applies to SecureCRT for Windows®.

The following steps will help you get VNC running over VShell. These steps assume that you are using SecureCRT as your port-forwarding client.

On the VShell/VNC server:

  1. In the VNC interface, set the following parameters:
    1. Check the Accept Socket Connections check box.
    2. Set "Display number" to "02" (this will configure the server to listen on port 5902).
    3. Set the password.

    Note: Setting "Display number" directly to "5902" may cause an error with the client.

  2. Create the following Registry entry:

    AllowLoopBack REG_DWORD "1"

    (hex) under the following key:

      HKEY_LOCAL_MACHINE\SOFTWARE\ORL\WinVNC3

  3. Restart the VNC service.

In your SecureCRT client:

  1. Select File / Connect... to open the Session Manager.
  2. Click on the New Session button and configure a SSH2 session that connects to the VShell/VNC server.
  3. Select the Connections / Port Forwarding category and press the Add button.
  4. Create a port forward entry with the following settings:
    1. Name: VNC (or whatever name is meaningful to you)
    2. Local Port: 5902
    3. Remote Port: 5902
    4. Clear the Destination host is different for the SSH server check box.
  5. Click on the OK button until you are back at the Session Manager and then click on the Connect button to initiate your new session.

In your VNCViewer:

  1. Enter "localhost:02" in the Connection details dialog.

The likely cause of this behavior is that when you attempt to change the session colors, you are actually changing the foreground and background color values for one of the globally defined color schemes.

To have each session use a different combination of foreground and background colors, you will need to create a color scheme for each color combination you wish to use.

For example, if "Session1" is using a custom color scheme named "blue-black" and you want another session to have a red foreground and a black background, you would create a new color scheme (e.g., named "red-black") and have Session2 use that color scheme.

The problem you are experiencing is that RedHat by default uses UTF-8 to encode its output. Either the version of SecureCRT that you are using does not support UTF-8 encoded output, or the output encoding is not set to UTF-8 for the session in use.

The following are three possible solutions to this problem:

Solution 1: Enable UTF-8 output encoding for the session in use

If you are using a version of SecureCRT prior to 4.0.1, you will need to update your version. This may be a free upgrade for you depending on when you purchased your SecureCRT license. Please check the Upgrades Pricing page on the VanDyke website to determine if you qualify.

To enable UTF-8 encoding for a session in SecureCRT 5.0, go to the Session Options dialog. In the Terminal/Appearance category, set the Character encoding in the Fonts group to "UTF-8".

To enable UTF-8 encoding for a session in SecureCRT 4.0.1 through 4.1.x, go to the Session Options dialog. In the Emulation/Advanced category, set the Output entry in the Character encoding group to "UTF-8".

Solution 2: Turn off UTF-8 encoding for your user on the RedHat machine

In your .bash_profile, add the following lines (this is for the bash shell; if you are using a different shell, the settings may be slightly different):

LANG=en_US
SUPPORTED=en_US:en
export LANG SUPPORTED

Note: The above commands use en_US as an example; other languages can also be used.

Solution 3: Turn off UTF-8 encoding system wide on the RedHat machine (Note: This solution requires that you have root access.)

In the file /etc/sysconfig/i18n there is a line that reads:

LANG="en_US.UTF-8"

Change the line to read:

LANG="en_US"

Note: The above commands use en_US as an example; other languages can also be used.

Note: This tip is for use with SecureCRT® for Windows®.

  1. If you have SecureCRT 5.5 or later, open the Global Options dialog and navigate to the Web Browser category.
  2. Click the Make SecureCRT Your Default SSH2 Application button.

If you want to open connections in tabs, you will need to edit the registry value as noted below:

WARNING: If you use the registry editor incorrectly, you may cause serious problems that may require you to reinstall your operating system. Before making changes to the registry, you should back up any valued data on your computer.

  1. Open regedit and navigate to HKEY_CLASSES_ROOT\ssh
  2. Change registry value from:

"C:\Program Files\VanDyke Software\Clients\SecureCRT.EXE" %1"

to

"C:\Program Files\VanDyke Software\Clients\SecureCRT.EXE" /T %1

You will now be able to start SecureCRT from your web browser by typing "ssh2://<hostname>" or by inserting that link in a web page.

Changing the following settings should improve the emulation when the remote machine is running SCO OpenServer 5.0.6 or later:

  1. On the SecureCRT® Session Options dialog, Emulation category, select "SCOANSI" as the Terminal emulation. The SCOANSI emulation should be used with any SCO server. Also, ensure that the rows and column settings are appropriate. SCO applications generally prefer 25x80.
  2. On the Session Options dialog, Emulation/Advanced category, check the Terminal type check box and enter "ansi" in the associated text box. This will send "ansi" instead of "scoansi" when you connect. In SCO OpenServer 5.0.6 and later, "scoansi" is no longer mapped to "ansi", and so "ansi" must be specified manually.
  3. In versions of SecureCRT prior to 4.1, the Terminal font works best. On the Session Options dialog, Appearance category, select Terminal as the Normal font. Make sure that the Character encoding option is set to "Default" in the Emulation/Advanced category.
  4. In SecureCRT 4.1 and later, use the Terminal font by selecting "Terminal" as the "Normal font" on the Session Options dialog, Appearance category. Make sure that Character encoding is set to "Default" in the same category.

    It is also possible to use a TrueType Windows font. To do this, on the Session Options dialog, Appearance category, select a TrueType Windows font such as Courier New or Lucida Console and set "Character encoding" to OEM.
  5. Finally, on the remote machine, make sure the TERM environment variable is set to "ansi".

Note: This tip is for use with SecureCRT® for Windows®.

If you cannot hear beep sounds when SecureCRT receives BELL characters while connected to a remote system, the first step is to make sure that your SecureCRT session is configured to play the beep sounds:

  1. From the SecureCRT Options menu, select Session Options.
  2. In the Terminal category of the Session Options dialog, verify that the Audio bell option is enabled.
  3. If you still cannot hear beep sounds, the next step is to check the system audio settings.

  4. From your system's Start menu, select Control Panel.
  5. Open the Sounds and Multimedia applet. In Windows XP, this is called Sounds, Speech, and Audio Devices and then you will have to select Sounds and Audio Devices.
  6. Select the Sounds tab on the Sounds and Audio Devices dialog.
  7. Make sure that the Windows/Default Beep event is set to something other than "(None)". You can test this setting by pressing the "Play" button (the button with the right-facing arrow next to the "Sounds" field).
  8. If the "Play" button is grayed-out or you can't hear a sound when you press it, then you probably need to install or repair your system's sound drivers.

If the system audio setting appears to be correct and you still do not hear beep sounds in SecureCRT, it may be due to a registry setting made by Tweak UI, which is an optional utility application from Microsoft.

  1. From the Start menu, select Control Panel.

  2. If you see Tweak UI on the list of Control Panel applets, open it and verify that the Beep on errors option on its General tab is enabled. If you change this setting, you may need to reboot in order for it to take effect.

If you still cannot hear beep sounds, please contact VanDyke Software technical support at support@vandyke.com.

If you are having problems getting color scheme settings to work, you may need to uncheck the ANSI Color option on the Emulation page in the Session Options dialog. The ANSI Color option will override any color scheme defined in the Appearance/Color Schemes page in the Global Options dialog.

For more tips, see our Overview of Color Configuration in SecureCRT.

SecureCRT has filters that control who can connect to port forwards that have been set up in SecureCRT. By default, only connections coming from the machine that SecureCRT is running on can connect to the port forwards.

You can change the port-forward filters by following the steps below.

  1. If SecureCRT is running, exit the program before continuing.
  2. Find the .ini file associated with the session that you want to modify. The .ini files are located in the SecureCRT Config folder under the subfolder called Sessions. The Global Options dialog also displays the location of the SecureCRT Config folder in the Configuration folder field.

  3. Open the .ini file in Notepad.
  4. Look for the following line:

    S:"Port Forward Filter"=allow,127.0.0.0/255.0.0.0,0 deny,0.0.0.0/0.0.0.0,0
  5. Modify the line to read as follows:

    S:"Port Forward Filter"=allow,127.0.0.0/255.0.0.0,0 allow,xxx.xxx.xxx.xxx,0 deny,0.0.0.0/0.0.0.0,0

    Alternately, you could modify the line to read as follows allowing any IP address to connect to the port forward:

    S:"Port Forward Filter"=allow,0.0.0.0/0.0.0.0,0

The instructions below describe how to move your sessions and settings to other machines and/or platforms. SecureCRT 7.3 and newer includes an import/export tool that makes it easier to create a backup or copy SecureCRT settings from one machine to another.

SecureCRT 7.3 and newer

  1. Install SecureCRT on the destination machine.
  2. On the source machine, run SecureCRT and select Export Settings from the Tools menu. Choose the folder location and specify a name for the XML file that will be created (e.g., SCRTConfig.xml).
  3. Copy the file created in Step 2 to the destination machine.
  4. On the destination machine, run SecureCRT and select Import Settings from the Tools menu.
  5. In the Import from file box, select the XML file from Step 3.

Note: If the configuration is set up to use a personal data folder, sensitive data such as usernames, passwords, and automated logon information will not be copied. If you would like everything to be copied, you will need to temporarily revert back to a single configuration folder. The Personal Config Data: 3) Reverting Back to a Single Config Folder Video on the VanDyke Software YouTube Channel shows how to do this or you can contact technical support for assistance.

SecureCRT 7.2 and earlier

Note: This information is specific to copying the entire session database from an old machine to a new machine. If you have created sessions on the new machine that you didn’t have on the old machine, the new sessions will be deleted. A number of paths (host key database, download/upload folder, etc.) are platform-specific, and may need to be modified after copying a configuration from one platform to another.

  1. Install SecureCRT on the destination computer.
  2. On the destination computer, open the SecureCRT Global Options dialog, select the General category, and note the Configuration folder location.
  3. On the source computer, open the Global Options dialog, select the General category, and note the Configuration folder location. The Configuration folder is set the first time SecureCRT is run after installation.
  4. Close all instances of SecureCRT on both the source and the destination computers.
  5. Copy the contents (including sub-folders) of the Configuration folder on the source computer to the Configuration folder on the destination computer.

Most session and setting information is used the same way on both platforms. These are some settings which are not.

  • For fonts, the default font is used (fonts are not guaranteed to exist on all platforms).
  • Serial port definitions may need to be modified.
  • Local folder locations may need to be modified. These may include host key database, identity, download, logging, logon scripts, and scripts associated with mapped keys or buttons.
  • Custom menus and toolbars are currently only supported on Windows.
  • Rlogin, TAPI, and Telnet/SSL connection protocols are currently only supported on Windows.

SecureCRT licenses are not currently platform-specific, but the license usage restrictions set forth in section three (3) of the End User License Agreement still apply:

3. USE AND EVALUATION PERIOD. You may use one copy of this Software on one client computer. For the purposes of this agreement, "computer" means a physical device or a virtual machine. A copy of this Software is considered "in use" when loaded into main memory (i.e., RAM). You may also use a copy of the Software on one additional computer, provided you make certain only one copy of the Software is "in use" at a time. You may use an evaluation copy of the Software for only thirty (30) days in order to determine whether to purchase the Software.

If SecureCRT is only running on one machine at any given time, then a SecureCRT license can legally be used to register SecureCRT on one (1) secondary Windows/Mac/Linux machine.

However, if SecureCRT needs to be running on multiple machines at the same time ever, a separate SecureCRT license must be purchased for each machine (regardless of OS platform).

Note: This usage policy is governed by the current license agreement for SecureCRT and is subject to change in future releases of SecureCRT.

If you need to purchase an additional SecureCRT license to run concurrently on a different machine, go to the Purchase page.

The older version of SecureCRT you are running is not designed for use on macOS Monterey 12.x. Since versions of SecureCRT prior to v9.2 are not supported on the macOS Monterey platform, individuals running older versions are encouraged to upgrade SecureCRT to resolve the issue.

Individuals who have licenses that are not eligible for registering a newer version of SecureCRT can either contact or visit the Pricing page for information on purchasing upgrade licenses.

To temporarily see hidden folders and files in a file section dialog, press the COMMAND+SHIFT+. key combination.

SecureCRT users who have used SecureCRT on the Windows platform may be accustomed to being able to specify loopback addresses other than "localhost" or "127.0.0.1" when manually selecting the local IP address on which to allow connections in port forward configurations.

Specifying loopback addresses like "127.0.0.2" or any 127.* loopback address works "out of the box" in a Windows environment because the Windows operating system has built-in support for such loopback addresses.

In contrast, macOS only provides SecureCRT with the following network interfaces "out of the box":

  • The machine's IP address
  • localhost
  • 127.0.0.1

macOS users with root or administrator privileges may be able to use the "ifconfig" command to configure aliases for additional loopback address within macOS for use with port forwarding configurations in SecureCRT. For example, issuing the following command within a "Local Shell" connection within SecureCRT would create an additional "127.0.0.2" loopback alias:

sudo ifconfig lo0 alias 127.0.0.2/32

Note: "sudo" is used to launch the command because "ifconfig" requires root privileges. If you do not have root/administrative privileges on your macOS machine, contact your system administrator for assistance in getting additional loopback addresses set up for use with SecureCRT.


The instructions below describe how to import your sessions from other platforms to SecureCRT for iOS.

iCloud Instructions (macOS)

  1. Make sure iCloud is enabled on the macOS system.
  2. On the macOS system, run SecureCRT and select Export Settings from the Tools menu. Navigate to the iCloud drive in Finder and specify a name for the XML file that will be created (e.g., SCRTConfig.xml).
  3. Make sure iCloud is enabled on the iOS device.
  4. In SecureCRT for iOS, select Manage Archives in the Global Options.
  5. Select Import (upper right).
  6. Select iCloud Drive under Locations and choose the XML file that was created in Step 2 above. The import will begin.

If any of the sessions use public-key authentication, see below for instructions on how to import a public key.

Email Instructions (Windows, macOS, or Linux)

  1. On the Windows, macOS, or Linux system, run SecureCRT and select Export Settings from the Tools menu. Choose the folder location and specify a name for the XML file that will be created (e.g., SCRTConfig.xml).
  2. Send the XML file to the iOS device using email.
  3. In the email client on the iOS device, save the XML file to the iCloud Drive or to the On My iPad/iPhone location.
  4. In SecureCRT for iOS, select Manage Archives in the Global Options.
  5. Select Import (upper right).
  6. Under Locations, select the location that was used in Step 3 above and choose the appropriate XML file. The import will begin.

If any of the sessions use public-key authentication, see below for instructions on how to import a public key.

Instructions for Importing a Public Key

  1. On the PC or Mac, locate the public key file and open it in an editor. Copy the key portion of the file.
  2. Paste the key string (copied in Step 1) into an email message and send it to the iOS device using email.
  3. In the email client on the iOS device, copy the key string from the email message that was sent in Step 2.
  4. Open SecureCRT for iOS and go to Global Options.
  5. Select Manage Public Keys under SSH2 and then select Import Private Key.
  6. Paste the string from Step 3 into the Private Key field. Fill in the Name and Passphrase (if appropriate) and select Import Key.

  7. After the key has been imported, it can be configured to be used with any new or existing session.

If you need further assistance importing your sessions to SecureCRT for iOS, please contact us.

If you're using SecureCRT® 8.0 or newer, a connection attempt to a server that supports only Diffie-Hellman key exchange can result in the following error:

Key exchange failed.
No compatible key exchange method. The server supports these methods: diffie-hellman

In SecureCRT 8.0 and later, the Diffie-Hellman key-exchange method is off by default because of the Logjam vulnerability. For the security-minded professional, Diffie-Hellman should be left disabled, and SSH2 server implementation should be upgraded or configured to support a more secure key exchange algorithm.

Diffie-Hellman should only be enabled in rare circumstances where the device to which you are connecting does not support a more secure key-exchange algorithm, and where upgrading the SSH2 server implementation isn't an option.

If you must enable the Diffie-Hellman key-exchange method to successfully connect to a legacy server that has no possibility (or low probability) of supporting more secure key-exchange algorithms, you can configure SecureCRT accordingly. Here are instructions for allowing a session to use this deprecated key-exchange method:

  1. Open the Session Options dialog for the session that needs to use Diffie-Hellman key exchange.
  2. Select the Connection/SSH2 category.
  3. In the Key exchange group, enable "diffie-hellman".
  4. Press OK to save the session.

If installing a newer version of SecureCRT causes the newer version of SecureCRT to run in evaluation mode, it means the license data in place on your machine is not eligible to register the newer version.

Resolving the Issue

If you installed a newer version of SecureCRT for which the existing license is not eligible to register, SecureCRT will provide you with 30 days of evaluation in which you can continue to use the newer version and evaluate whether the additional capabilities of the newer version are worth purchasing an upgrade license.

If your time spent evaluating the newer version does not convince you that it's worth purchasing an upgrade license, you can install the older version you were running prior to installing the newer version.

Installers for prior versions of VanDyke Software products can be found on the Previous Releases page.

Avoiding the Issue

To avoid installing a newer version of SecureCRT for which the existing license data is not eligible to register, individuals should use updated menu items found in SecureCRT's main Help pull-down menu. For more information, please see our Check Update Eligibility web page.

In SecureCRT 9.3 and later, there is an option called Check at Startup on the Update pull-right menu. When this option is set, SecureCRT will automatically check at startup for the availability of a newer version that is valid with the current license.

When you launch a new connection from the Session Manager, you may see one of the following arrangements:


The above situations can happen if you’ve set your sessions to Tile (Vertically/Horizontally) or Cascade from SecureCRT’s main Window menu or if you’ve disabled the Open Sessions in a Tab/Tile option within the Session Manager as shown below:

Note: As of version 9.5, "Open Sessions in a Tab/Tile" is no longer on the Session Manager context menu and can only be set in the Terminal category in the Global Options dialog.

If you want new connections to open in tabs in the same SecureCRT window, as displayed below, you can fix this in one or two steps.

  1. Choose Tabs from the Window menu in SecureCRT.
  2. Enable the Open Sessions in a Tab/Tile option within the Session Manager context menu (right-click on any folder/session to display the context menu).

Note: Although you may be right-clicking on one session or folder, this option is a global option and it will continue to provide the behavior that is enabled or disabled for all connections until it is toggled back the other way.

What is the problem?

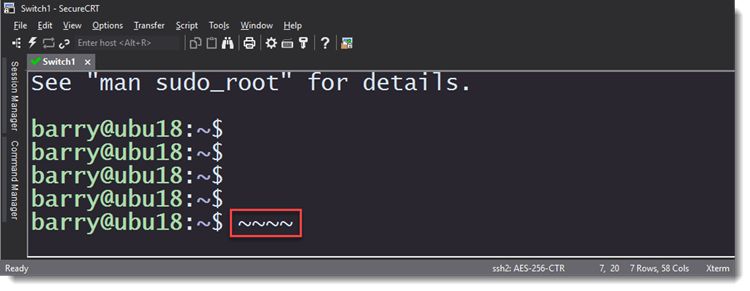
You're using SecureCRT to connect to an HP Aruba network device (or similar) and you have logging enabled. You can see the lines of information that you type in the terminal screen, but those lines are not included in the log file.

Why might this be happening?

In order to eliminate superfluous data from appearing in the log file (like when you mistype a command and have to backspace to correct it), SecureCRT writes data to the log file only when the end of the current line has been reached — in other words, when a CR or LF character is received. Once a CR or an LF character is received, SecureCRT takes the visible text on the current line and writes it to the log file.

Some remote hosts, such as HP Procurve and Aruba switches, don’t follow basic terminal norms in which a "line" is terminated with a CR or LF. When you press Enter to submit a command when connected to such devices, the device does not send SecureCRT any line termination character (a CR or an LF); rather, it sends SecureCRT a sequence of cursor movement codes that cannot be interpreted in a general case as being an "end of line marker". Since there is no CR or LF character received for that line on which a command has been typed — and because the cursor has now been moved to another line — the line with the command won't get logged by SecureCRT.

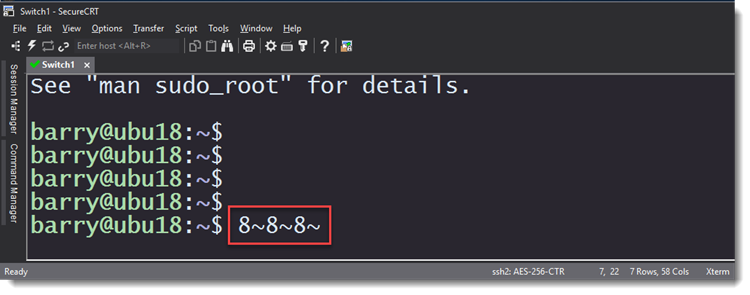
This is an image of the raw log of all of the escape sequences that were sent to SecureCRT by a particular Aruba device after Enter was pressed to complete a command:

Image of raw log of the escape sequences sent to SecureCRT by an Aruba device after 'Enter' was pressed to complate a command

A raw log captures ALL characters received from a connected device. You can see that the device doesn't send any CR or LF when a command is echoed back to SecureCRT.

You can also see that the raw log file is unreadable because of the extraneous escape sequences that these devices send whenever any character is typed into the terminal.

What’s the solution? In what SecureCRT version is the solution available?
A new INI-file-only session option called Log Screen was added as of SecureCRT version 8.7. This option allows all data displayed in the terminal to be logged at the time it appears on screen, as opposed to when a CR or LF is received by SecureCRT.

From within a script
When logging inside script code, this is how the option can be enabled:

Python:
crt.Session.Config.SetOption("Log Screen", True)

VBScript: (Windows only)
crt.Session.Config.SetOption "Log Screen", True

Using a button to change the current session's Log Screen option
If you want, you can map a button to a script that enables this option on a per-session basis. Just save the line of Python code shown above to a file named SetLogScreen.py (if you copied the Python code) or SetLogScreen.vbs (if you copied the VBScript code) on your system and map a button to run the script (see the SecureCRT's Button Bar video on our YouTube channel).

When you click the button, the session associated with the active tab will have its Log Screen option enabled.

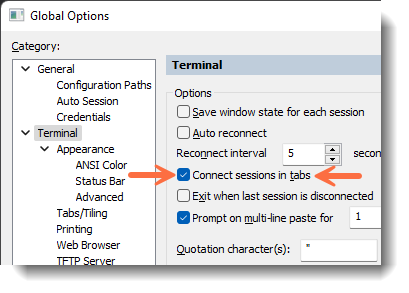
Changing the option manually
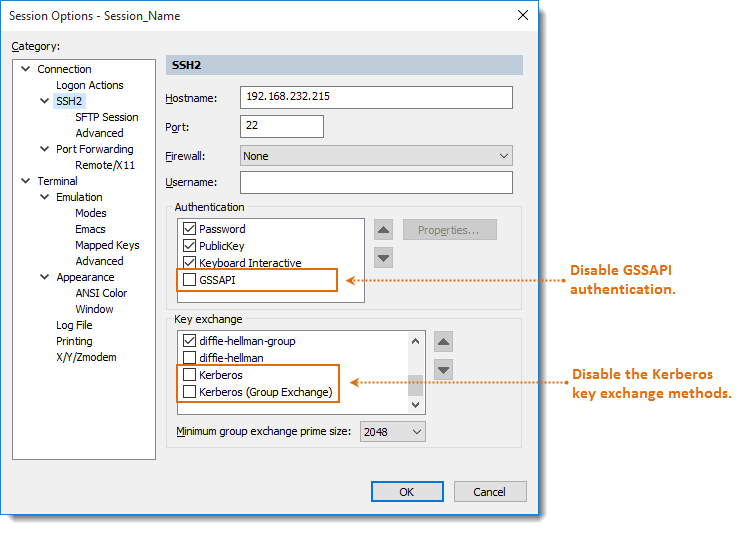
If, instead, you want to manually change this setting, navigate to the .ini file for that particular session (session .ini files are found in the Config\Sessions folder on your machine, and the configuration folder path can be seen under the General / Configuration Paths category of Global Options). Edit the .ini file and make the change illustrated below:

change

D:"Log Screen"=00000000

to

D:"Log Screen"=00000001

If there’s no D:"Log Screen" line in your .ini file, the first thing you should ensure is that you're running SecureCRT version 8.7 or newer. If so, then you can simply add the D:"Log Screen"=00000001 line to the end of your session's .ini file.

Note: You should always close all instances of SecureCRT that are running before you edit a session's .ini file.

What caveats are there?
This Log Screen option will log everything that is sent to SecureCRT’s terminal screen. This includes redraws that are caused by backspaces or tab completions, which means that generally, the log file is going to show some interesting things. For example, if you used tab completion and backspace to correct some errors a couple times while typing in the following command:

show ip route connected

…in the log file you might see something like this:

Aruba-1# shiAruba-1# shoAruba-1# show ip royAruba-1# show ip rouAruba-1# show ip route connAruba-1# show ip route connected

For each backspace or tab completion, the device actually re-draws the entire line; and these re-draw occurrences will show up in the log file because SecureCRT is now logging every character that has been displayed on the screen.

Have you noticed unexpected characters displayed on the command line of your active SecureCRT session window periodically?

If you are seeing ~, 8~, or other junk characters inserted in your active session periodically, you likely have the application Caffeine installed on your machine.

Resolution
Uninstall the Caffeine app or reconfigure it as per the vendor's instructions (see below).

Additional Details
By default Caffeine simulates a keystroke every 59 seconds to keep the machine from going into a slumber/hibernation state. Additional information is provided by the authors of the program on their website at: https://www.zhornsoftware.co.uk/caffeine/

Caffeine works by simulating an F15 key up event every 59 seconds. Of all the key presses available, F15 is probably the least intrusive, and least likely to interfere with your work.

However, Caffeine might interfere with some apps:

  • PowerPoint uses the F15 keypress to pause video in a slide
  • Google Docs/Sheets
  • Terminal emulation, e.g., Putty

If you think any of these might cause you a problem, set the -useshift command line parameter.

By default, SecureCRT will only allow you to select a font that is known to the system as a "fixed-width" or "monospaced" font.

If a specific font does not show up in SecureCRT's font chooser window, it is because the font is missing the "fixed-width" (monospace) designation — in other words, its creator/designer did not mark the font as being a fixed-width font.

Screenshot showing Select Font window in Session Options / Default

If a font you would like to use isn't registered/marked as fixed-width (all glyphs in the entire font map share the exact same horizontal width), you may still be able to use the font in SecureCRT.

To allow all fonts to be displayed in SecureCRT's font picker:

  1. Close all instances of SecureCRT that are running.
  2. Edit the Global.ini file found in SecureCRT's configuration folder (see Global Options / Configuration Paths).
  3. Modify the Allow Proportional Fonts value to 00000001 and save your changes.
    Warning: If you choose a font that is not monospaced (i.e., fixed width) you will have display problems because glyphs within the font do not have the exact same width.
Screenshot showing that SecureCRT only displays fixed-width fonts in the Select Font window

In SecureCRT, SecureFX, or SFXCL, if an SSH/SFTP connection attempt fails, it may be that the network connections from your app/computer are being blocked from successfully making outgoing connections. This could be caused by a misconfigured firewall (either hardware or software), a switch, a router, or some other device between you and the server that is not allowing the connection to go through to the remote server or not relaying back its response. It might also be caused by an application installed on your system that restricts/controls an application's ability to make outgoing network connections — in which case an exception may need to be added in order for SecureCRT, SecureFX, or SFXCL to successfully make an outgoing network connection.

This FAQ addresses two common scenarios you might see in a SecureFX/SFXCL log, or in SecureCRT with Trace Options debug output enabled (File / Trace Options).

  1. Connected for s seconds, 0 bytes sent, 0 bytes received
    In this situation, SecureCRT/SecureFX/SFXCL has asked the operating system to make a TCP connection to the specified host/address. The connection was not established, so no data (bytes) could be sent and no data could be received.

    This is usually caused by one of the scenarios below, all of which are outside SecureCRT's/SecureFX's/SFXCL's ability to fix/resolve:

    • SecureCRT/SecureFX/SFXCL is being blocked by local application monitoring and control software that is preventing SecureCRT/SecureFX/SFXCL from making outgoing network connections on this machine.
      Address the situation by adding an exception to the monitoring and control software to allow SecureCRT/SecureFX/SFXCL to successfully make outgoing network connections.
    • SecureCRT/SecureFX/SFXCL is on a machine that has a hardware/software firewall or proxy that is not allowing the machine to make outgoing connections.
      Address the situation by properly configuring the hardware/software firewall or proxy to allow for outgoing connections.
    • The remote server to which you're trying to connect may not accept connections from your machine. SecureCRT/SecureFX/SFXCL cannot force the remote machine to accept its connection request.
      Address the situation by checking with the admininstrator of the remote machine to make sure there are no connection filters in place to prevent successful connection.
    • The remote server to which you're trying to connect may not be listening on the configured address/port. If the remote machine is not configured to listen on the standard protocol port 22 for SFTP/SSH, you will need to configure SecureCRT/SecureFX/SFXCL to connect to the address+port indicated by the administrator of the remote machine's SSH2/SFTP server.
      Address the situation by checking with the administrator of the remote machine to verify the listening address+port.
    • There may not be any network connectivity between your machine and the remote machine. SecureCRT/SecureFX/SFXCL cannot connect if there is not a network route between your machine and the remote machine.
      Address the situation by verifying network connectivity between your machine and the remote SSH/SFTP server.
  2. Connected for s seconds, n bytes sent, 0 bytes received
    In this situation, SecureCRT/SecureFX/SFXCL was able to get successfully connected to at least send some initial data over the established connection. Typically, the number of bytes sent is equal to the SSH2 ident string that the product sends as the initial protocol handshake to begin setting up the SSH connection with the remote SSH2/SFTP server. For example, a 64-bit SecureCRT 8.5.1 sends the following ident string for negotiating the SSH2 protocol with a server:

    SSH-2.0-SecureCRT_8.5.1 (x64 build 1764)
    123456789 123456789 123456789 123456789 123456789 123456789

    For the 64-bit version of SecureCRT, the ident string would be exactly 40 characters long. Add on the trailing CR and LF characters and you end up with 42 bytes sent for the ident string. For SecureFX/SFXCL, the ident string isn't as long, so you would end up with fewer characters/bytes being sent, but the general idea is the same.

    This scenario where a non-zero amount of bytes are sent, but 0 bytes are received is caused when the remote server — or any networking firewall/proxy in between the client and the server — accepts the connection, but when SecureCRT/SecureFX/SFXCL sent its ident string the connection was then immediately closed, or timed out later without SecureCRT/SecureFX/SFXCL receiving any bytes back from the connected peer.

    Possible causes include the scenarios below:

    • The remote server disconnected due to a configuration on the server not allowing the connection to continue.
      Check with your SSH/SFTP server administrator to determine why the server closed the connection.
    • A firewall/switch/router/networking device somewhere along the network route between SecureCRT/SecureFX/SFXCL's machine and the remote SSH/SFTP server terminated the connection before any data could be returned from the server to SecureCRT/SecureFX/SFXCL. When SecureCRT/SecureFX/SFXCL receives notification from the operating system that a network connection has closed, there is no recourse for SecureCRT/SecureFX/SFXCL to protest nor petition for the connection to remain open; it's closed and SecureCRT/SecureFX/SFXCL can do nothing about it.
      Troubleshoot this issue by inspecting logs of the remote SSH/SFTP server, and every network device in between SecureCRT/SecureFX/SFXCL and the remote SSH/SFTP server.

If it seems your SSH2 connection attempts are hanging, taking a really long time, or timing out completely, it could be that SecureCRT is configured to attempt GSSAPI authentication or Kerberos key exchange in an environment where GSSAPI/Kerberos is not possible between your machine and the SSH2 host you're trying to reach.

To troubleshoot most connection issues, turn on Trace Options and try to establish the SSH connection again. If you are not familiar with Trace Options, you can view the Trace Options Debug Logging video for information about how to create a debug/troubleshooting log.

If your Trace Options output includes anything resembling the following pattern, it's likely that the delay/hang/timeouts are being caused by your SecureCRT configuration:

...
[LOCAL] : GSS : Requesting full delegation
[LOCAL] : GSS : [Kerberos] SPN : host@<host_you_are_trying_to_reach>

        <...delay...>

[LOCAL] : GSS : [Kerberos (Group Exchange)] InitializeSecurityContext() failed.
...

The above pattern may likely be repeated for each GSS/Kerberos provider available on your system, which would explain the delays/timeouts that you are seeing when SecureCRT is attempting to establish a connection to the SSH server.

To resolve the problem, you can simply disable all GSSAPI and Kerberos related Authentication and Key exchange methods in the SSH2 category of your Session Options as shown in the graphics below.

Mac:

Screenshot showing how to disable GSSAPI and Kerberos authentication in the Session Options / SSH2 category on the macOS version of SecureCRT

Windows:

Screenshot showing how to disable GSSAPI and Kerberos authentication in the Session Options / SSH2 category on the Windows version of SecureCRT

You can employ the power of editing the Default session to make these changes to all of your existing and future sessions. Here are links to a tip and a video that provide more details about using the Default session to make mass changes to multiple sessions:

Changing Default Settings for New and Existing Sessions (tip)

The Default Session (YouTube video)

Note: In order for a "change" to be applied to all other sessions, the Default session's option you're targeting must actually be modified/different from its current value. This means that if the Authentication and Key exchange method in your Default session are already set how you want them (with GSSAPI authentication and all the Kerberos kex methods disabled), you must first change the Default session's Authentication and Key exchange methods to enable one or more of them in the Authentication and Key exchange options (and apply that "change" to just the Default session) and then edit the Default session again to set the GSSAPI Authentication and Kerberos-related Key exchange methods so they're disabled, (and apply that "change" to ALL of your existing sessions).

In some situations, the horizontal scroll bar is either not visible, or it will not allow scrolling all the way to the right to display the entire contents of the session window.

The horizontal scroll bar is only visible when it's enabled in SecureCRT's View menu.

The horizontal scroll bar is only useful when all three of the settings below are in place:

  1. The session option Retain size and font is selected in the On resize group of the Session Options / Terminal / Emulation category;
  2. The session option Logical columns value is greater than what can visibly be seen within the SecureCRT window; and
  3. The horizontal scroll bar is enabled in SecureCRT's View menu as mentioned above.

See the following graphic for clarification:

Screenshot showing the session option settings that are needed for the horizontal scrollbar to be useful

Note that if the remote system's understanding of the number of columns is less than what SecureCRT says is available, then the remote system will only utilize a portion of the columns available in SecureCRT's window because the remote shell/app value for columns doesn't match SecureCRT's value for columns.

Such a mismatch usually happens when either:

  1. The columns shell variable is manually/automatically manipulated (either by you manually trying to set the columns shell variable or a remote shell/startup/profile script setting columns to a value that is hard-coded) after SecureCRT has already negotiated the number of columns with the remote shell, or
  2. The remote shell ignores SecureCRT's column size negotiation or the remote device isn't capable of terminal size negotiation.

SecureCRT is licensed per computer, not user or server.

As defined in the SecureCRT End User License Agreement (EULA), a computer can be one of the following:

  • A client machine running a client operating system like Windows, macOS, or Linux.
  • A seat, which is defined as a software or hardware client that has access to use SecureCRT installed on a centralized machine (e.g., a terminal server, jump host, or RDS server).

You will need one SecureCRT license for each computer that has access to use SecureCRT locally or remotely.

If you remove SecureCRT from one computer, you can register SecureCRT on a new computer using the same license that was in use on the old computer.

To assist with transferring a SecureCRT license from one computer to another, you may wish to use the import/export wizard as follows (also shown in the graphic below):

  1. Launch SecureCRT on the old computer, click on the main Tools drop-down menu and select Export Settings….

    When the Export Settings window appears, enable the License option (and Global Options and Sessions, if desired), specify a location and name for the file that will be created, and press the Export button.
  2. Copy the resulting XML file from your old computer to your new computer.
  3. Launch SecureCRT on the new computer, click on the main Tools drop-down menu and select Import Settings from XML File….

    When the Import Settings window appears, enable the License option (and Global Options and Sessions, if desired), use the Browse button to navigate to the XML file you copied to your machine, and press the Import button.
Graphic demonstrating the three steps to follow when using the import/export wizard to transfer your SecureCRT or SecureFX license to a new machine

SecureCRT supports cross-platform substitutions for well-known paths. In other words, if any path stored in a field within a SecureCRT global or session configuration begins with a well-known path, the value is saved to the configuration in substitution form rather than in literal form. This means that if you choose to have your log files stored in a folder that descends from one of these well-known locations, it will be cross-platform compatible.

Here's a list of the well-known paths that are saved in substitution format automatically by SecureCRT when the value is written to the configuration (and converted to the actual path on the system when the value is read from the configuration):

${VDS_CONFIG_PATH}

SecureCRT's configuration folder path as defined in the Global Options / Configuration Paths category. If SecureCRT's configuration path is set to "C:\Users\user\AppData\VanDyke\Config", any file-related setting that contains this path will result in the path being substituted with ${VDS_CONFIG_PATH} when saved to the configuration.

Example: Log file in GUI on Windows is set to:

C:\Users\user\AppData\VanDyke\Config\Logs\%S\%Y%M%D_%h%m%s_%t_Log.txt

When written to the configuration, the above becomes:

${VDS_CONFIG_PATH}\Logs\%S\%Y%M%D_%h%m%s_%t_Log.txt

This means that if this session configuration is loaded on a macOS machine where the configuration folder is set to:

/Users/User/Library/Application Support/VanDyke/SecureCRT/Config

the ${VDS_CONFIG_PATH} is automatically converted to the /Users/User/Lib.../Config path.

${VDS_INSTALL_PATH}

The location where the SecureCRT application lives.

${VDS_USER_DATA_PATH}

The location to the user's "My Documents" or "Documents" folder. In this and other cases, you can combine a substitution with relativism (e.g., ${VDS_USER_DATA_PATH}\..\..\folderB\etc\).

${VDS_SSH_DATA_PATH}

The location of user-specific SSH data (on Windows, this is My Documents; on macOS/Linux, it's the user's .ssh folder).

Note: All of the above substitutions are handled automatically. When you look in the Global Options or Session Options dialogs at a field where any component of a path represents one of the above locations, you'll actually see the resolved location, not the substitution path. If you look inside the configuration file, you'll see the substitution path rather than the actual paths.

Three Fast Ways to Learn More…

  1. Read or download one of our secure solutions white papers.
  2. Download a free evaluation copy of our products.
  3. Let us help define the right Secure Shell solution for your company.

VanDyke Software uses cookies to give you the best online experience. Before continuing to use this site, please confirm that you agree to our use of cookies. Please see our Cookie Usage for details.