SecureCRT 9.2 and later provides a Text Import Wizard for importing sessions from a text file. Located in Tools / Import Settings from Text File..., this built-in functionality can be used in the majority of cases to import arbitrary data from a file into SecureCRT sessions. For details about using the Text Import Wizard, see the tip, How to Import SecureCRT Sessions from CSV/Text File Data Using the Text Import Wizard.
If you want a custom import option or need to import settings that are not included in the default Text Import Wizard, the example and script below serve as a starting point.
This script can also be found in the scripting example, Import Arbitrary Data From File to SecureCRT Sessions.
SecureCRT sessions can be imported from an external source if you keep a list of the servers, routers, and other devices that you need to connect to saved in a .csv or other type of data file. With a data file, you can use a script to import the data into SecureCRT sessions, rather than manually creating them one at a time.
In this tip, we explain how to set up an example data file and provide an example script code (also see below) for you to use and modify for your specific setup. You only need a few basic script-editing skills to get started (more extensive knowledge may be required to customize the example script to meet your needs).
The example script gathers information about your host machines from your .csv data file in order to create the .ini files that will become your SecureCRT sessions. There are comments within the script code explaining the expected format and organization of the data file. The comment lines in the script begin with a single character (a ' single quote or "tick" character for VBScript and a # character for Python).
The following steps show you how you might use the techniques described in the script to generate sessions from your data file.
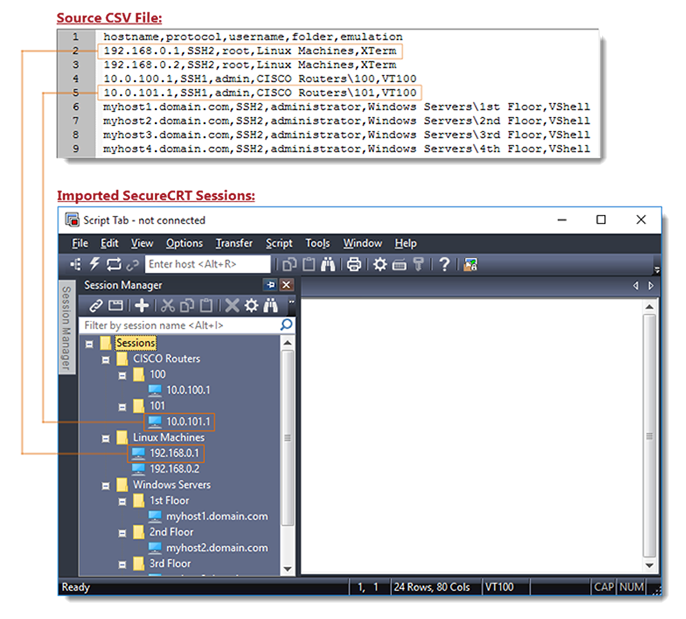
The first thing you'll need is a data file that contains the host information you wish to import into SecureCRT as sessions. The format below most closely matches the format that the script uses. If your data file only includes some of the information, simply make sure that the header line in your data file includes only those fields that the rest of your data file contains. The following is an example of what your data file might look like:
hostname,protocol,username,folder,emulation
192.168.0.1,SSH2,root,Linux Machines,XTerm
192.168.0.2,SSH2,root,Linux Machines,XTerm
10.0.100.1,SSH1,admin,CISCO Routers,100,VT100
10.0.101.1,SSH1,admin,CISCO Routers,101,VT100
myhost1.domain.com,SSH2,administrator,Windows Servers/1st Floor,VShell
myhost2.domain.com,SSH2,administrator,Windows Servers/2nd Floor,VShell
myhost3.domain.com,SSH2,administrator,Windows Servers/3rd Floor,VShell
myhost4.domain.com,SSH2,administrator,Windows Servers/4th Floor,VShell
The first line of your data file names the fields used and their order. In the example above, the header line of the data file is the first line:
hostname,protocol,username,folder,emulation
The remaining lines in the data file are lines that have actual data to be imported, whereas the first line is simply a template that instructs the import script how to interpret the fields on each remaining line.
The example data file shown above uses a comma character as the delimiter between fields, but the script can work using a comma, space, semicolon, or tab as the delimiter. If your delimiter character is not a comma, simply modify the value of the g_strDelimiter variable in the script to match your specific delimiter character(s).
Note: The value of the emulation field must match a valid SecureCRT emulation option as displayed in the Terminal option in the Terminal / Emulation category of the Session Options dialog. However, the following protocols are not currently supported for import using this script: Serial, TAPI, and Raw.
The field keywords that the script is designed to recognize as valid header row components are as follows:
| session_name | The value that will be used for the session’s name. If this field does not exist, the hostname field is used as the session_name. |
| folder | A relative folder path for the specified session (not including the session name) as displayed in the Session manager. Any folder that does not exist will be automatically created as the script runs. |
| hostname | Required. The hostname or IP address for the remote server. |
| protocol | Required. The protocol to be used for connecting with the session (SSH2, SSH1, Telnet, or RLogin). |
| port | The port on which the remote server is listening. |
| username | Username for the account on the remote server. |
| emulation | The emulation (vt100, xterm, etc.). |
| description | Comment/description. Multiple lines are separated with \r. |
You might have already noticed that the example data file above doesn't include a session_name field. When there isn't a session_name field, the hostname information will be used as both the hostname and the session name when importing.
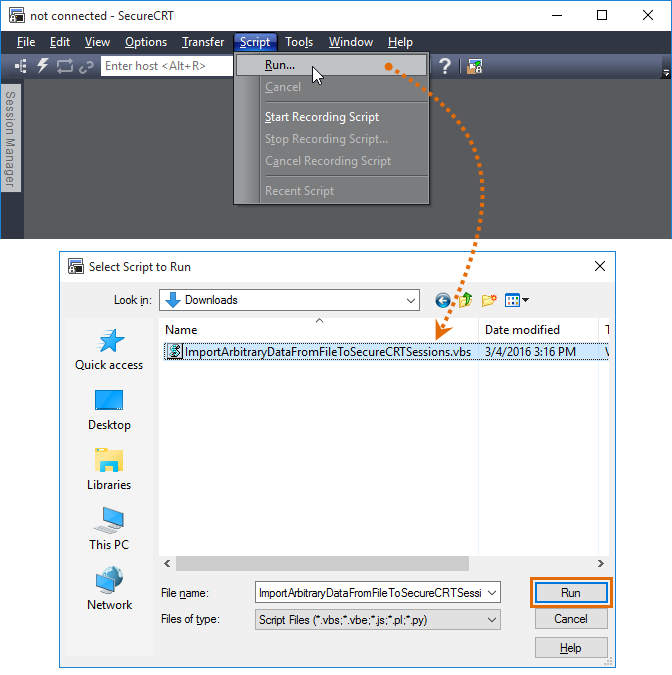
Once you have made the necessary configuration changes to your data file and/or the script, you can launch the script by opening up SecureCRT and choosing Run... from the main Script pull-down menu.
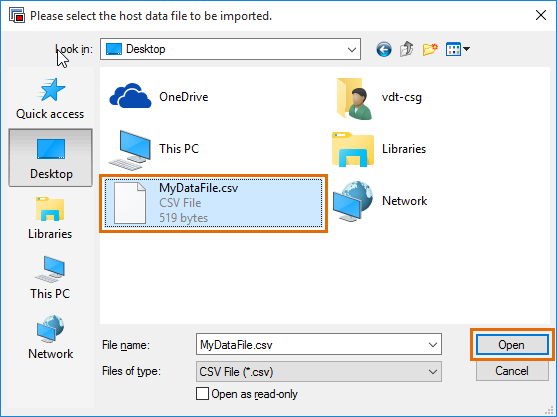
The first action the script will take is to prompt you for the location of your data (CSV) file.
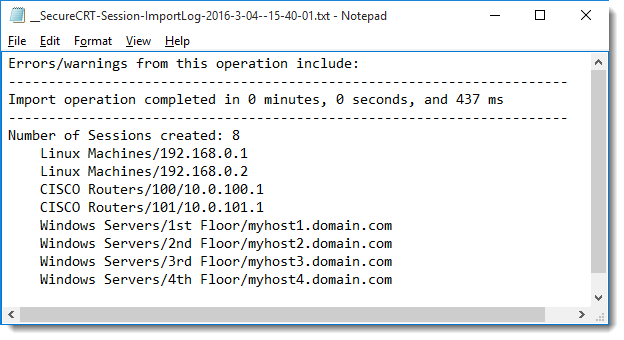
Once you have specified which data file to use for importing session configurations, the script will attempt to create sessions using the information in your data file. After the work has been completed, the script will write information to a log file and display the contents of the log file.
For example:
After the script has completed, simply close SecureCRT's Session Manager and then open it again to see the sessions that were added.
Note: If a session was found to already exist, the imported session will have a time stamp appended to its name to avoid overwriting any existing sessions that have the same name.
ImportArbitraryDataFromFileToSecureCRTSessions.py.txt (65.82 KB)
VanDyke Software uses cookies to give you the best online experience. Before continuing to use this site, please confirm that you agree to our use of cookies. Please see our Cookie Usage for details.