VanDyke Software

Tips

Index

How to Import SecureCRT Sessions from CSV/Text File Data Using the Text Import Wizard

A text file import wizard in the import/export tool allows you to create saved sessions by importing data from a CSV, TSV, plain-text file, or other delimited text file — no need to import manually or run an import script!

This feature is available in SecureCRT 9.2 and newer.

Note: If you want a custom import option or need to import settings that are not included in the default Text Import Wizard, see the tip, Importing SecureCRT Sessions from a Data File.

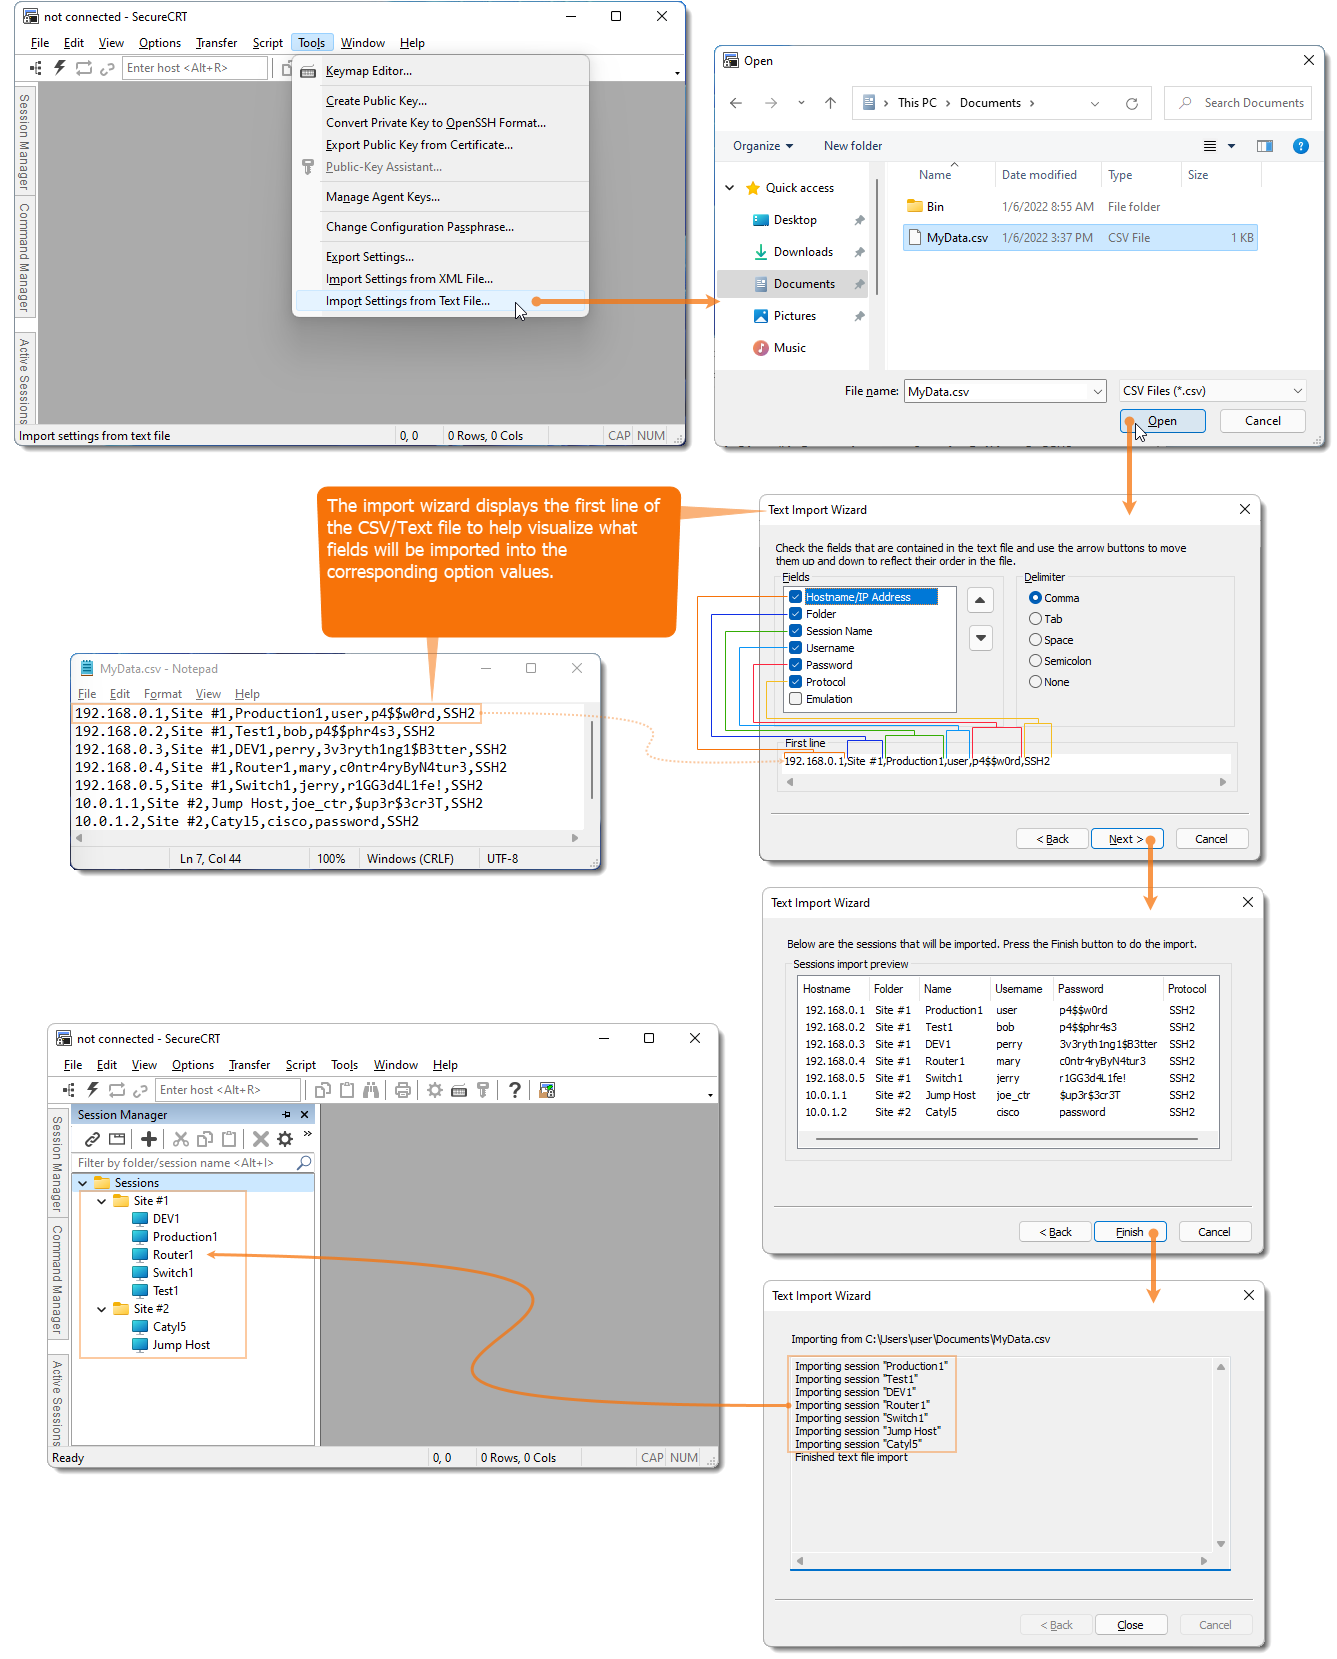
The steps below demonstrate how to use the text file import wizard.

  1. Prepare for the import process by creating a delimiter-separated values file that uses any of the following as field delimiters: comma, tab, space, or semicolon.

    The following fields are supported for importing into SecureCRT:

    • Hostname/IP Address — The host name or IP address of the device to which the session will connect
    • Folder — The folder organization in the Session Manager that will be created/used for storing the new session
    • Session Name — The name of the session as it will appear in the Session Manager; if a session with the specified name already exists, a new session will be created with "(n)" appended to the name
    • Username — The user account name that will be used for the authentication process (only supported with SSH2, SSH1, and RDP protocols)
    • Password — The account password, in plain text, that will be used for authenticating (only supported with SSH2, SSH1, and RDP protocols)
    • Credentials — The title of a set of saved credentials (only supported with SSH2 and RDP protocols)
    • Protocol (e.g., SSH2, SSH1, Telnet, Telnet/TLS, etc.)
    • Emulation (e.g., Xterm, VT100, VT220, TN3270, etc.)
    • Description — A description for the session; use \r for line breaks and \" to escape quotes

    The only required field that must be present is: Hostname.

    Note: An option is available to have a data file that has no delimiters (e.g., Hostname is the only field present on each line). In this case, the value on each line will be imported into a session, where the value from that line is used as both the session name and host name.

    The following protocols are supported:
    SSH2
    SSH1
    RLogin
    Telnet
    Telnet/TLS
    Raw
    RDP (supported in version 9.3 and newer)

    The following protocols are not supported:
    Local Shell
    Serial
    TAPI

  2. After you have prepared your source values file for import as described, open SecureCRT and, from the main Tools pull-down menu, select Import Settings from Text File… .
  3. When the Text Import Wizard appears, the first line of the CSV/text file you specified will be displayed, and you will need to:
    • Enable/Disable entries in the Fields listing that are not present in your CSV/text file.
    • Arrange the entries in the Fields listing to match the order of the values that appear on a single line in your CSV/text file.
    • Select the Delimiter value that matches the delimiter character used in your data file. Remember, if your data file only has a hostname on each line, select the None Delimiter value.
  4. Press the Next button in the Text Import Wizard to preview the data that will be imported; use the Back button to go back and adjust if the fields that do not match what is displayed in the preview.
  5. Press the Finish button to initiate the import operation and the Close button once the import operation has completed.
Screenshots demonstrating how to use the Text Import Wizard

VanDyke Software uses cookies to give you the best online experience. Before continuing to use this site, please confirm that you agree to our use of cookies. Please see our Cookie Usage for details.