This how-to and accompanying video introduces the button bar on SecureCRT for Windows. The same general concepts also apply to SecureCRT on Linux and macOS platforms.
View the Button Bar Video on the VanDyke Software YouTube Channel.
SecureCRT’s button bar is a customizable row of buttons you can use for quick access to saved actions and commands. To display the button bar, open the View menu and select Button Bar. By default, the button bar appears below the terminal screen. To hide the button bar, open the View menu and select Button Bar again.
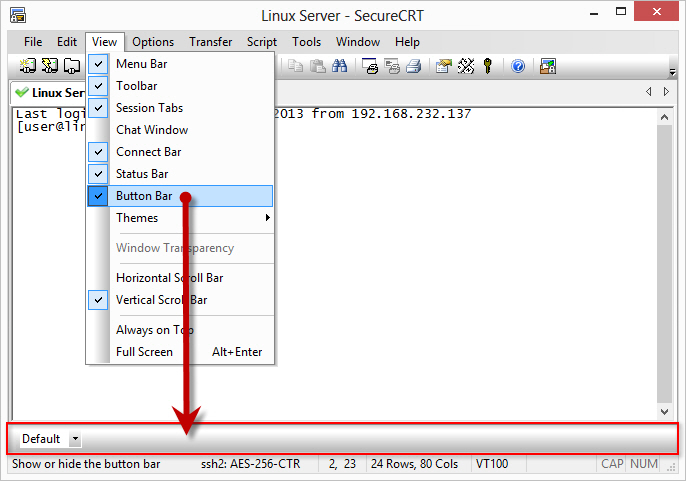
View/Hide the Button Bar
To add a button, right-click on the button bar and choose New Button.
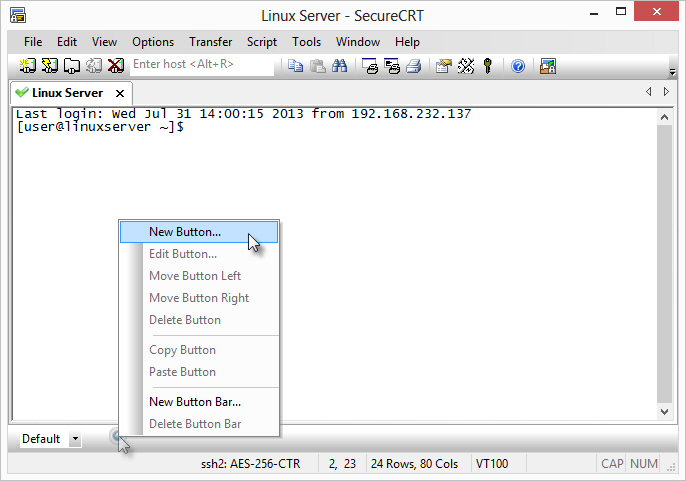
Add a New Button
When creating a button, you specify the function that will be performed when the button is pressed. This how-to and video demonstrate the Send String and Run Script functions. Details about each of the button functions you see here can be found in the SecureCRT program Help.
The Send String button function is used to send text or commands to a remote machine. You can send just about any text that you want, and there are unique commands (or codes) that can be used to instruct SecureCRT to send special characters like carriage return, newline, escape, tab, or backspace. The \p command code causes a one-second delay. A command code that is not listed here but is found in the SecureCRT Help is the \v command, which takes text from the clipboard and sends it to the connected machine. You can also send any ASCII character using a backslash followed by the character’s three-digit octal code.

Map Button to Send a String
This example uses SecureCRT version 6.7 connected to a Linux machine and starts at the remote shell prompt. First, you will create a button with a Send String function that will automatically open the vi editor, enable “insert” mode, and paste the contents of the clipboard.
In the Send String field, type the corresponding commands:
vi \r \p i \p \v \p \033

Example of vi Paste Button Added to Button Bar
If you want to create a copy of an existing button that does something similar but with a slight variation, just right-click on the existing button and choose Copy. Then, right-click anywhere on the button bar and choose Paste. You'll have a copy of the button which you can then modify to perform a slightly different task.
You can follow this basic pattern to create a library of buttons for running common commands you use frequently, or even complex commands that you don't want to spend time remembering or reinventing.
The Run Script button function is used to extend the functionality of SecureCRT even further by running a script to perform customized actions. The installation of SecureCRT for Windows includes a number of example scripts. The script used in this demonstration takes any text selected in SecureCRT's terminal screen and saves it to a file.
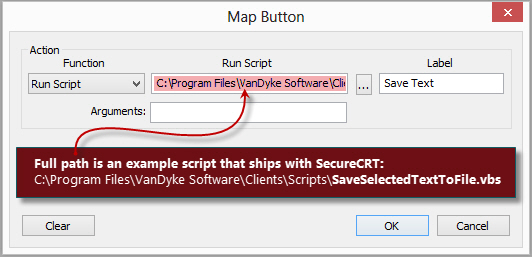
Map Button to Run a Script
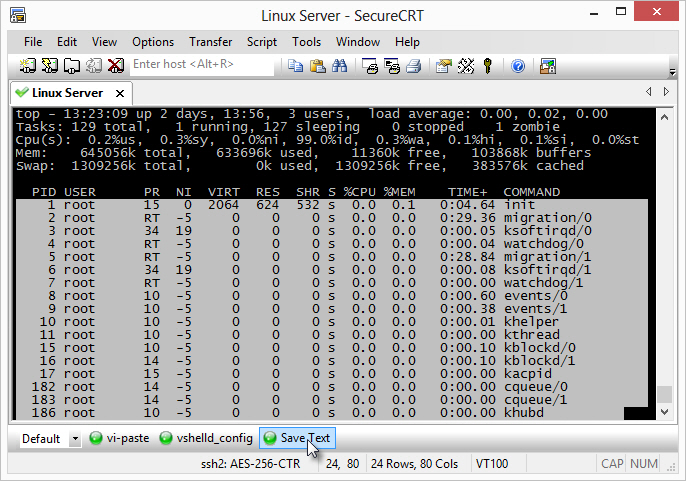
Example of Running Save Selected Script Text to File from the Button Bar
Now that you've seen the Send String and Run Script button functions in action, we show you a few more extras regarding the SecureCRT button bar.
Up to this point, we've been interacting with the "Default" button bar, which always exists in SecureCRT. You can create additional button bars named to reflect your specific needs. To create a new button bar, right-click anywhere within the "Default" button bar and choose the New Button Bar... menu item.
Not only can you create a number of different button bars, but you can also associate session configurations with an initial button bar that will be activated automatically when a session is connected (or when a tab with that session is activated). This example has two different sessions: "Remote Machine" and "Linux Server". The "Remote Machine" session is configured with the option to show the "Configs" button bar.
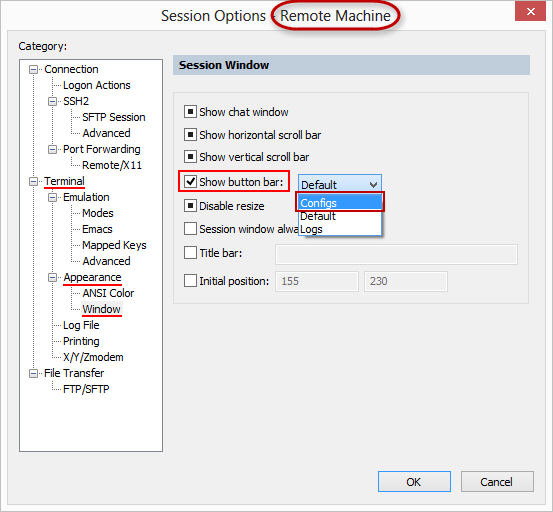
Example "Remote Machine" Configuration
On the other hand, the "Linux Server" session is configured with the option to show the "Logs" button bar.
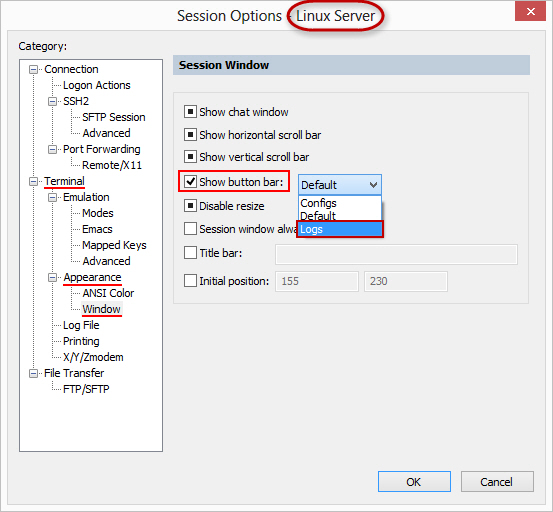
Example "Linux Server" Configuration
When first starting SecureCRT, the default button bar is enabled. When you connect to the "Remote Machine" session, you can see that the "Configs" button bar is automatically enabled. When the "Linux Server" session is connected, SecureCRT automatically switches to the "Logs" button bar. If the "Remote Machine" session is activated, the button bar automatically switches back to the "Configs" button bar. You can always choose another button bar from the list of button bars you've created, but it's nice to know that for any session you can specify which button bar you'd like to have SecureCRT show initially.
If you have questions, comments, or ideas about the button bar that you’d like to address, or if you would like to see additional video content about other SecureCRT features and functionality, please contact our technical support team.
Additional resources:
Using the SecureCRT Button Bar to Run Scripts, Commands, and Launch Programs
VanDyke Software uses cookies to give you the best online experience. Before continuing to use this site, please confirm that you agree to our use of cookies. Please see our Cookie Usage for details.