SecureFX® FAQ

Select by category

Yes, in most cases. SecureFX and SecureCRT® are available for export under U.S. Bureau of Industry and Security regulations governing strong encryption software. Import restrictions by other countries may also affect encryption software availability. For more information, please see our web page on Exporting Encryption Software.

There are several things that you need to be aware of when entering the license information into the License Data dialog.

The Name, Company, Serial Number, License Key, and Issue Date fields must be entered exactly as shown in the registration notice (case is important). For example, the Expiration field should be "Never" as opposed to "never".

The key is made up of the letters A to F and the digits 0 to 9, so make sure that no letter "O"s have been entered in place of a "0" digit. We recommend using CTRL+V to paste the data into the license dialog (you can usually use CTRL+C to copy). Also, after you have entered the data into the fields, make sure that no leading or trailing blanks are present.

If you still get the "Invalid key" message after entering the registration data, exit out of SecureFX® and start over.

If this does not resolve the problem, please contact us.

No, you do not have to remove your old installation; the new version can be installed right over the existing files without losing your current configuration.

SecureFX licenses are not currently platform-specific, but the license usage restrictions set forth in section three (3) of the End User License Agreement still apply:

3. USE AND EVALUATION PERIOD. You may use one copy of this Software on one client computer. For the purposes of this agreement, "computer" means a physical device or a virtual machine. A copy of this Software is considered "in use" when loaded into main memory (i.e., RAM). You may also use a copy of the Software on one additional computer, provided you make certain only one copy of the Software is "in use" at a time. You may use an evaluation copy of the Software for only thirty (30) days in order to determine whether to purchase the Software.

If SecureFX is only running on one machine at any given time, then a SecureFX license can legally be used to register SecureFX on one (1) secondary Windows/Mac/Linux machine.

However, if SecureFX needs to be running on multiple machines at the same time ever, a separate SecureFX license must be purchased for each machine (regardless of OS platform).

Note: This usage policy is governed by the current license agreement for SecureFX and is subject to change in future releases of SecureFX.

If you need to purchase an additional SecureFX license to run concurrently on a different machine, go to the Purchase page.

Some editors, such as Microsoft Word, lock the file so that it cannot be read by other applications while it is being edited. In these cases, SecureFX has to wait until the file is closed before it can be uploaded.

If you are installing SecureCRT 4.1 or later and SecureFX 2.2 or later on a machine that has never had SecureCRT or SecureFX installed on it, they will automatically share the host key database.

The instructions below describe how to move your sessions and settings to other machines and/or platforms. SecureFX 7.3 and newer includes an import/export tool that makes it easier to create a backup or copy SecureFX settings from one machine to another.

SecureFX 7.3 and newer

  1. Install SecureFX on the destination machine.
  2. On the source machine, run SecureFX and select Export Settings from the Tools menu. Choose the folder location and specify a name for the XML file that will be created (e.g., SFXConfig.xml).
  3. Copy the file created in Step 2 to the destination machine.
  4. On the destination machine, run SecureFX and select Import Settings from the Tools menu.
  5. In the Import from file box, select the XML file from Step 3.

SecureFX 7.2 and earlier

Note: This information is specific to copying the entire session database from an old machine to a new machine. If you have created sessions on the new machine that you didn’t have on the old machine, the new sessions will be deleted. A number of paths (host key database, download/upload folder, etc.) are platform-specific, and may need to be modified after copying a configuration from one platform to another.

  1. Install SecureFX on the destination computer.
  2. On the destination computer, open the Global Options dialog, select the General category, and note the Configuration folder location.
  3. On the source computer, open the Global Options dialog, select the General category, and note the Configuration folder location. The Configuration folder is set the first time SecureFX is run after installation.
  4. Close all instances of SecureFX on both the source and the destination computers.
  5. Copy the contents (including sub-folders) of the Configuration folder on the source computer to the Configuration folder on the destination computer.

For the SSH and FTP protocols to pass through the Microsoft Proxy Server requires either the WinSock proxy client (Windows version only) on your machine or the SOCKS proxy protocol to be installed on the server. Check with your system administrator for information about which of these two methods to use.

If you are using the WinSock proxy client (Windows only version), the proxy will appear transparent to you, and no special SecureFX configuration is required. Make sure that SecureFX's firewall is set to "None" in the Session Options/Connection/SSH2 category.

If the server has SOCKS installed, select the "SOCKS version 4" firewall type. Enter the IP address of the Microsoft Proxy Server and the port it is using (usually 1080).

The Dot Files option in the View menu shows or hides dot files that have been returned in the file listing. However, some FTP servers do not return the dot files in the file listing by default. To make the FTP server return the dot files in the file:

  1. In the Connect dialog, right-click on the session name and choose the Properties option.
  2. Select the Connection/FTP category or the Options/FTP in versions of SecureFX prior to 3.0.
  3. In the Directory listing options group, check the All entries check box.
  4. Click on the OK button to save your settings.

This should cause the FTP server to return dot files in the file listing. Toggling the Dot files option in the View menu will now show or hide the files.

To temporarily see hidden folders and files in a file section dialog, press the COMMAND+SHIFT+. key combination.

SecureFX has two ways to schedule or automate file transfers: the SFXCL command-line utility (Windows version only), and the Task Scheduler (available in Windows versions 8.0 and newer).

SFXCL

SecureFX for Windows includes SFXCL (sfxcl.exe), a command-line tool that lets you automate routine secure file transfer operations with batch scripts. SFXCL can be combined with public-key-only authentication to automate secure, unattended file transfers. SFXCL also supports deleting, renaming, moving, and listing files.

For more information on using SFXCL to automate secure file transfer operations, please see our SFXCL Command-Line Tool FAQ page and the SFXCL Automation Guide.

Task Scheduler

The built-in task scheduler allows you to schedule transfer and synchronize operations. Tasks can be run once or set to run at daily, weekly, or monthly intervals.

The Task Scheduler dialog is accessed by selecting Schedule Task... from the Tools menu. This dialog allows you to create or modify scheduled transfer and synchronize tasks.

Scheduled tasks use sfxcl.exe and the Windows Task Scheduler. You must have permissions to run sfxcl.exe and it must be in your default path. This is normally configured properly during the installation of SecureFX.

Note: You must not be using a configuration passphrase. Scheduled tasks will fail if a configuration passphrase is used.

The remote session specified for a task must be configured to connect without requiring user interaction (e.g., for password authentication, the password must be saved in the session).

You must be logged in to Windows at the time the scheduled task is configured to run, but SecureFX does not need to be running.

For more information on using the Task Scheduler, please see the SecureFX application Help.

If you're using SecureFX® 8.0 or newer, a connection attempt to a server that supports only Diffie-Hellman key exchange can result in the following error:

Key exchange failed.
No compatible key exchange method. The server supports these methods: diffie-hellman

In SecureFX 8.0 and newer, the Diffie-Hellman key-exchange method is off by default because of the Logjam vulnerability. For the security-minded professional, Diffie-Hellman should be left disabled, and SSH2 server implementation should be upgraded or configured to support a more secure key exchange algorithm.

Diffie-Hellman should only be enabled in rare circumstances where the device to which you are connecting does not support a more secure key-exchange algorithm, and where upgrading the SSH2 server implementation isn't an option.

If you must enable the Diffie-Hellman key-exchange method to successfully connect to a legacy server that has no possibility (or low probability) of supporting more secure key-exchange algorithms, you can configure SecureFX accordingly.  Here are instructions for allowing a session to use this deprecated key-exchange method:

  1. Open the Session Options dialog for the session that needs to use Diffie-Hellman key exchange.
  2. Select the Connection/SSH2 category.
  3. In the Key exchange group, enable "diffie-hellman".
  4. Press OK to save the session.

Known Causes

If SecureFX's icon is missing from SecureCRT's tool bar following an install of the SecureCRT + SecureFX bundle on your Mac, it's most likely due to macOS having triggered "App Translocation" (also known as "Gatekeeper Path Randomizaton" or "GPR").

App translocation can be caused by any of the following scenarios:

  • Moving/copying the apps by a means other than Finder (e.g., Terminal).
  • Application bundles installed from .tar.gz installers will always have this issue.
  • Application bundles installed from the combined .dmg installer may or may not have this issue depending on how they are installed:
    • If the application bundles are copied one at a time, individually, to the /Applications directory, they should not have this issue.
    • If the application bundles are copied together (e.g., both selected and dragged from the mounted .dmg) to the /Applications directory, they appear to always have this issue.

Solution

The solution is to run the following command(s) in the terminal shell on your Mac:

xattr -d com.apple.quarantine /Applications/SecureCRT.app/
xattr -d com.apple.quarantine /Applications/SecureFX.app/

Additional Background

The issue is that the "App Translation" attribute is not being removed from the SecureCRT/FX .app bundles once they are moved into /Applications (or apparently any other folder). Here is a quick write-up on when App Translocation should and should not occur (content derived from https://lapcatsoftware.com/articles/app-translocation.html:

Under what circumstances does App Translocation occur?
First, the app must have a com.apple.quarantine extended attribute. If you delete the quarantine attribute using xattr, then App Translocation does not occur, and the app will launch from where it was unarchived, like normal.

Second, the app must be opened by Launch Services. This usually means Finder, but it can also mean open from Terminal, for example. If you launch the app executable directly from bash, on the other hand, App Translocation does not occur.

Third, the app must not have been moved — by Finder. If you move the app, using Finder, from the app's original unarchived location to another folder, even a subfolder, e.g., ~/Downloads/Test/, then App Translocation does not occur. However, if you move the app using mv from Terminal, then App Translocation will still occur. Normally you would move the app from ~/Downloads to /Applications, and that would cause the app to be launched from /Applications like normal, but the locations of the particular folders don't seem to matter. The mere act of moving the app using Finder stops App Translocation from happening. Indeed, once you've moved the app once, it will no longer experience App Translocation again, even if you then move it back to ~/Downloads.

To check if an application will be translocated, run the following command within the terminal shell:

   security translocate-policy-check /Applications/SecureCRT.app/ 
   security translocate-policy-check /Applications/SecureFX.app/

Possible results for the above commands:

  • Would translocate
    Meaning: App translocation is active for the app.
  • Would not translocate
    Meaning: App translocation is not active for the app.

To check if quarantine attribute is set on an app bundle, run the following command within the terminal shell:

   xattr /Applications/SecureCRT.app/ 
   xattr /Applications/SecureFX.app/

The above command will report either com.apple.quarantine or an empty string.
SecureFX is licensed per computer, not user or server.

As defined in the SecureFX End User License Agreement (EULA), a computer can be one of the following:

  • A client machine running a client operating system like Windows, macOS, or Linux.
  • A seat, which is defined as a software or hardware client that has access to use SecureCRT installed on a centralized machine (e.g., a terminal server, jump host, or RDS server).

You will need one SecureFX license for each computer that has access to use SecureFX locally or remotely.

If you remove SecureFX from one computer, you can register SecureFX on a new computer using the same license that was in use on the old computer.

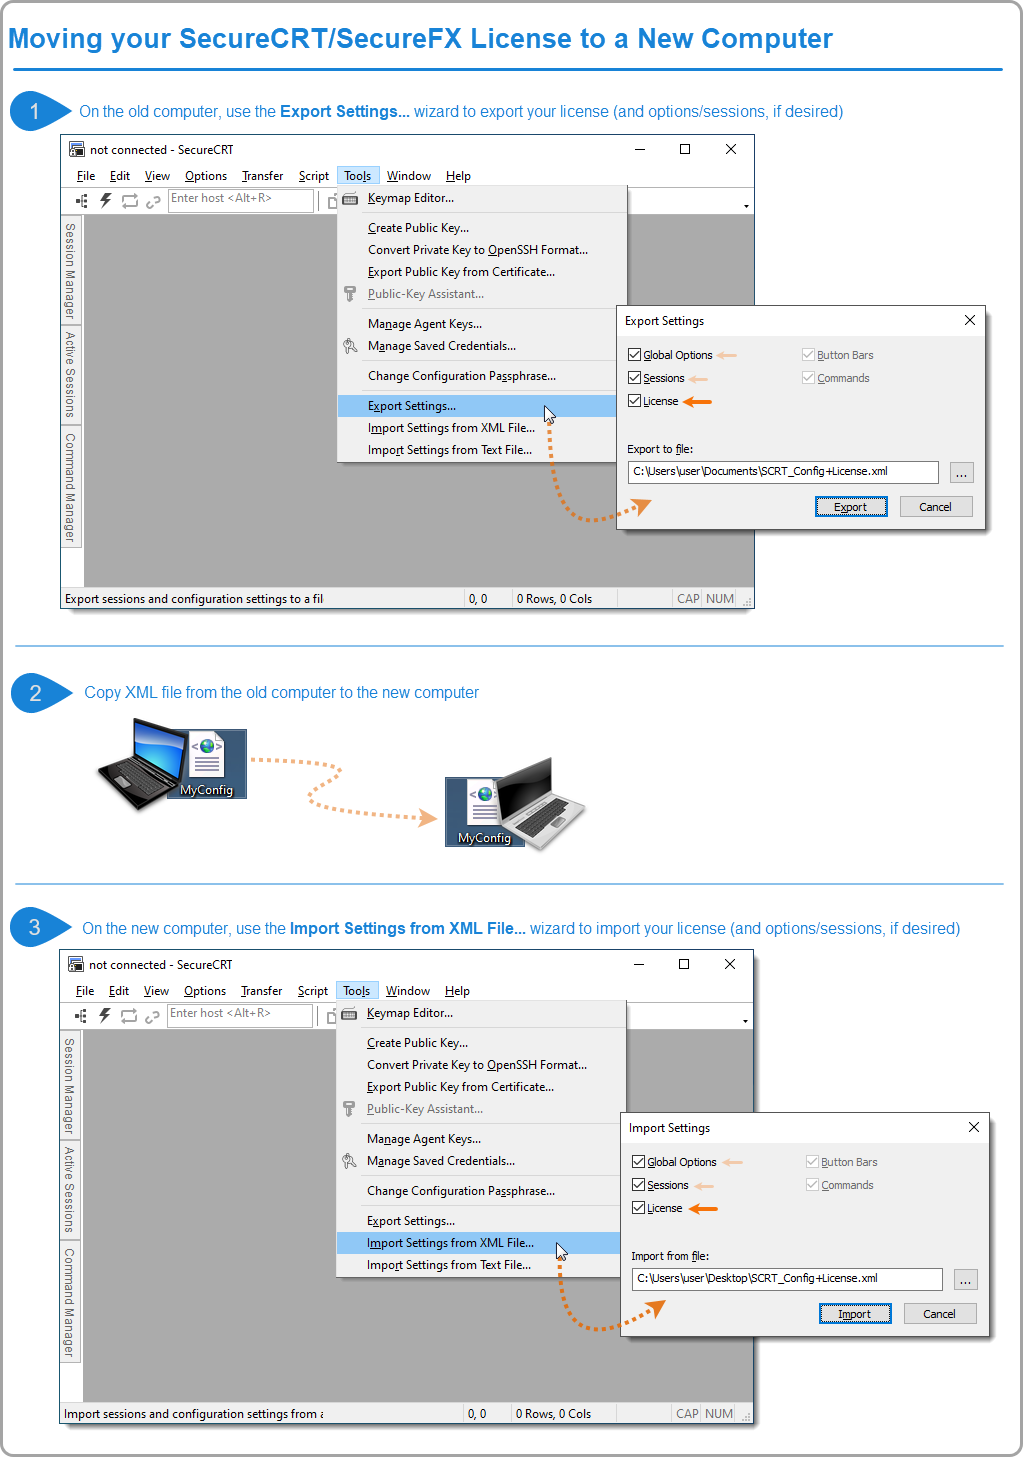
To assist with transferring a SecureFX license from one computer to another, you may wish to use the import/export wizard as follows (also shown in the graphic below):

  1. Launch SecureFX on the old computer, click on the main Tools drop-down menu and select Export Settings….

    When the Export Settings window appears, enable the License option (and Global Options and Sessions, if desired), specify a location and name for the file that will be created, and press the Export button.
  2. Copy the resulting XML file from your old computer to your new computer.
  3. Launch SecureFX on the new computer, click on the main Tools drop-down menu and select Import Settings from XML File….

    When the Import Settings window appears, enable the License option (and Global Options and Sessions, if desiredd), use the Browse button to navigate to the XML file you copied to your machine, and press the Import button.
Graphic demonstrating the three steps to follow when using the import/export wizard to transfer your SecureCRT or SecureFX license to a new machine

Three Fast Ways to Learn More…

  1. Read or download one of our secure solutions white papers.
  2. Download a free evaluation copy of our products.
  3. Let us help define the right Secure Shell solution for your company.

VanDyke Software uses cookies to give you the best online experience. Before continuing to use this site, please confirm that you agree to our use of cookies. Please see our Cookie Usage for details.