VShell Enterprise Edition with HTTPS allows end users to connect to the VShell HTTPS server to transfer files easily using their web browser. This documentation provides detailed instructions on how to customize the VShell User Web Interface, including its title, colors, logo, and more.
In short, if a configuration file named custom.cnf exists in a directory named custom\ located in the VShell installation folder under HttpsFiles\, VShell will use the settings in the file to determine the look and feel of the web interface. Therefore, the VShell User Web Interface can be customized with the following steps.
Edit the VShell Web User Interface Configuration (custom.cnf) file.
Copy desired image files to the custom_example\ folder.
Rename the custom_example\ folder to custom\.
Connect with your Internet browser to see the effect.
The following sections provide details on each step.
Step 1: Edit the VShell Web User Interface Configuration (custom.cnf) file
Navigate to the example VShell Web User Interface customization directory that is included with the HTTPS files in the VShell installation.
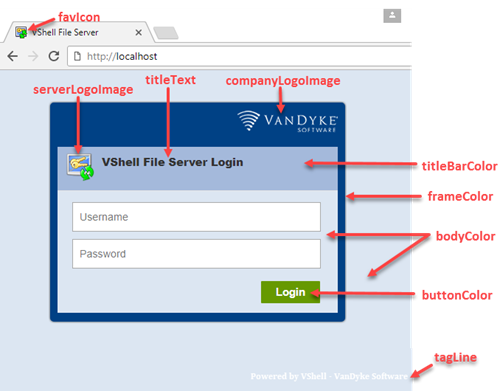
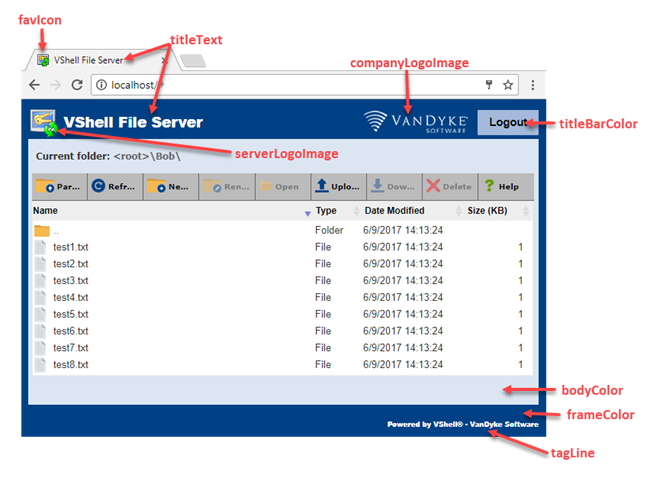
The VShell Web User Interface consists of the login page and the main page.
The two diagrams below illustrate which areas on each of these pages is affected by the different custom.cnf file settings.
Login Page Main Page
Comments
Two slashes at the beginning of the line indicate a comment.
You can add text to document your settings or negate the effect of any setting in the file by inserting "//" at the beginning of the line.
Title Text
Use the titleText setting to specify the string that will appear at the top of the login page, the top of the main page, the top of prompts, and the top of the help section.
No quotes should be used to delimit the string. Standard HTML character codes must be used for symbols.
For no title at all, set the tag line to nothing, as follows:
titleText:
Colors
Colors for web pages are specified in RGB (Red/Green/Blue) hexadecimal values. For more details on how colors work, see the Microsoft page HTML Color Table. Note that the color names mentioned on these pages are not used by VShell because they may not be interpreted correctly by all browsers.
The page referenced above provides a table with a number of predefined colors. Alternatively, it may be helpful to use a HTML color picker such as the one provided by w3schools.com at https://www.w3schools.com/colors/colors_picker.asp.
Tagline
Use the tagLine setting to specify the string that will appear at the lower right of the VShell User Web Interface.
No quotes should be used to delimit the string. Standard HTML character codes must be used for symbols.
If no tag line is desired, set the tag line to nothing, as follows:
tagLine:
Step 2: Copy desired image files to the custom_example\ folder
Images
Images must be *.png files. For best results:
The server logo image should be square, between 30x30 and 40x40 pixels in size.
The company logo image should be no more than 30 pixels in height.
If you do not want one of the images, specify none for that image.
Icons
The icon image must be a *.ico file.
The icon should be square, 16x16 pixels in size.
Images in other formats can be converted into *.ico files using various applications, for example Windows Paint.
Step 3: Rename the custom_example\ folder to custom\
The custom.cnf file is only used when is located in a folder
named "custom".
Therefore, to put your customization in place, rename the custom_example\ folder to custom\.
If you want to temporarily suspend the use of the custom configuration, simply rename the folder.
Step 4: Connect with your Internet browser to see the effect
This step assumes you have already set up VShell so that the HTTPS service is running and you can successfully connect to VShell with your Internet browser.
Important Note: If the appearance of the VShell User Web Interface does not change, it is likely because you need to clear your browser cache. In other words, may need to delete cookies and temporary Internet files that your browser has stored on your computer for faster web page display.
Repeat Steps 1-4 until you achieve the desired effect.
VanDyke Software uses cookies to give you the best online experience. Before continuing to use this site, please confirm that you agree to our use of cookies. Please see our Cookie Usage for details.
Manage our use of cookies
Here you can control cookies using the checkboxes below. Some cookies are essential for the use of our website and cannot be disabled. Others provide a convenience to the user and, if disabled, may reduce the ease of use of our site. Finally, some cookies provide anonymous analytic tracking data that help us provide the user with a richer browsing experience. You can elect to disable these cookies as well.